
Recently I visited a friend in Maine and crocheted a seat cover for her chair. A photo of the cover went viral after I posted it on social media, and demands, well, more like “pretty, please” requests, poured in …
Many of my fellow hookers tried to figure out how the top chains were made. The best guess was using the back post method. That’s where the stitch is made around the post of the stitch on the previous round, by inserting the hook from the back. That way also turns the top V loops to the front, but it also makes the V loops stand up higher, and the rounds get lower, or closer to each other. I was surprised no one guessed the Hump Stitch method!
The chair has a big and comfortable seat, armrests in the right places, and a tall back. It swivels, and it has wheels. It’s also heavy and sturdy. In other words, a chair to cherish. Unfortunately, my friend had loved it to the point the seat cover had broken and the cushioning had settled a bit. When I saw it, I knew instantly what it needed: some tender loving care of freeform crochet!
When I told my friend I wanted to yarnbomb the chair, she got delighted and went to the “box room” to retrieve a big bag full of yarns somebody had given her.
To get ideas and to explain “yarnbombing”, we looked online at photos of chairs covered in beautiful, awesome crochet. Both my friend and I really liked the look of green moss-like colors and textures. That would fit her so well since she loves nature walks and makes jewelry and mirror frames with seashells, sea glass, stones, and other natural materials.
When we opened the bag of yarns and poured them out on the bed, we were shocked. The colors were not exactly the natural hues we had envisioned, neither were the fibers. A mismatch of colors, all 4 ply acrylic yarn by Red Heart. The only green was a dark Christmas green color.

Not having the time to go hunting for pretty green yarns, I just somehow had to mix our yarns to make them look good together. In order to get a feel of the yarn, I grabbed the yellow yarn and crocheted a star. The yarn was thick and clumsy, but also both strong and soft. It would make a good seat cover! I started with a 4 mm hook, but changed it to a 5 mm one.
I added a second color around the star, making the new stitches behind the outline of the star in order to make it pop.

That’s when I decided to use the Hump Stitch method to add interest and strength. I continued adding several rounds, randomly picking a new color for each round, as well as making more scrumbles/shapes and incorporating them between the rounds.
Satisfied with the look and feel of the fabric, and my friend really liking the happy, fun colors, I decided this was the best I could do with the yarns I had, and to just keep crocheting.
Before continuing I needed a template for the seat cover. My friend gave me an old hoodie to use as scrap fabric. I cut it up and placed it on the seat, then I cut out the template by freehand, without going too much into measuring anything.

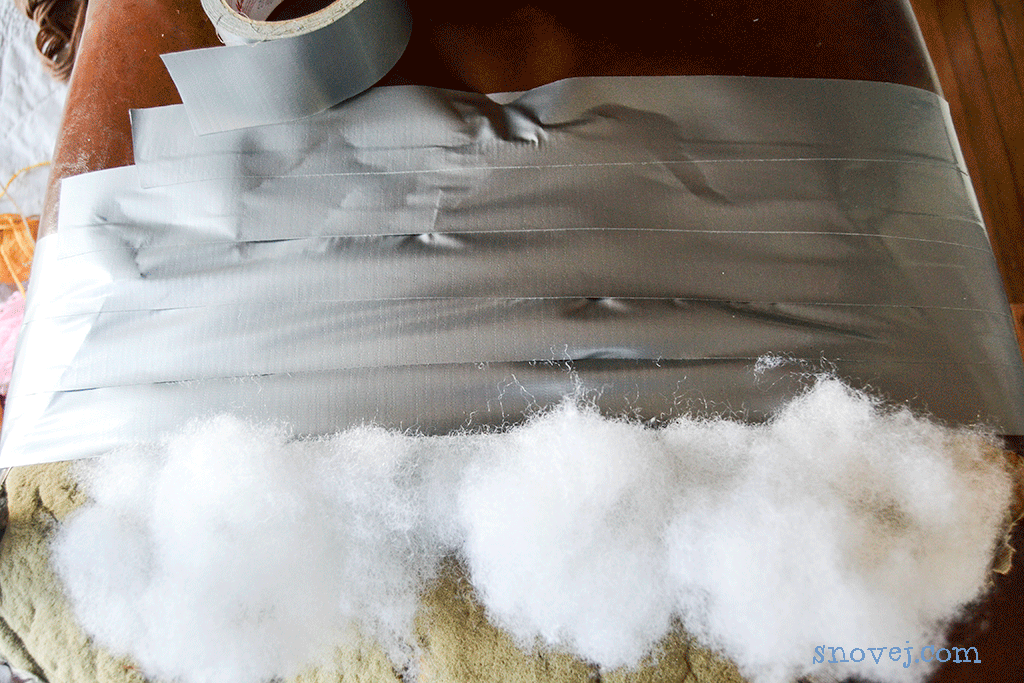
To mend the seat, I cut away the broken parts of the faux leather cover, added some polyester filling, and taped it all down with duct tape! A fast, easy, and cheap fix!
I placed the template flat down and placed the crocheted work on it.
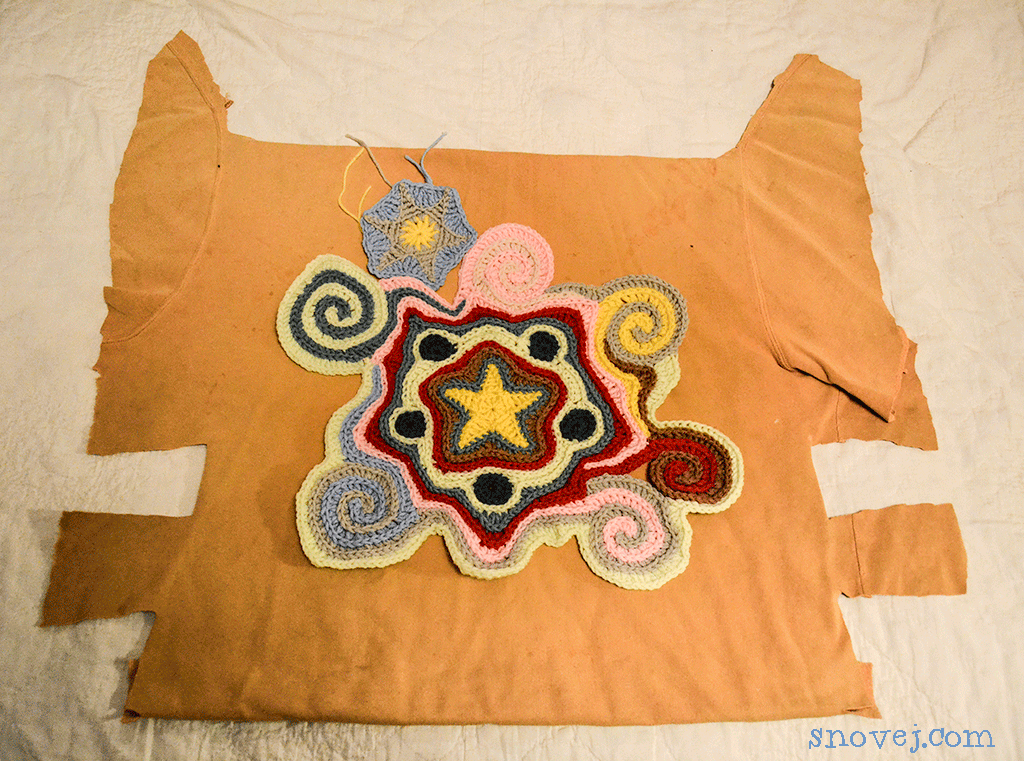
With the template as my guide I added more rounds/rows, stars, spirals, a heart, and an infinity symbol. When the work got big and the edge was close to the edges of the template, I pinned them together with safety pins, kept the work flat on my bed and crocheted around to make the edges meet up. To get the corners in the front to bend properly, I removed the template and placed the work on the chair, holding it in place as I crocheted. My friend had fun at my weird “work positions”!
The Hump Stitch:
The Hump Stitch is also called The Camel Stitch or Camel Crochet. It’s often used in crocheted garments to create an edge resembling knit ribbing. In that case the work is done with single crochet by going back and forth, and thus turning every other top V chain to the back of the work. When you go back and forth, the hump will be on the front of the fabric.
To create the chains to only go on the front of the fabric, the work is done by crocheting from the right side only, either by working in the round, or by starting each row with a new yarn. Working this way, the hump is found on the back of the fabric.
The backside of all stitches has a hump. It looks a bit different in each stitch, the single crochet being the most difficult for inserting the hook, and the half double crochet being the easiest.
Hump Stitch in a Chain:
A chain stitch is made of three loops, the front and back loops of the V, and the third loop is on the backside. That’s the hump. The humps are marked with orange dots in the photo.

Hump Stitch in Single Crochet:
To find the hump of a single crochet stitch, turn the fabric and find the loop, which looks like a horizontal small bar, next to/under the back loop of the V loops. This loop is tight. You might need to loosen it up by inserting a darning needle or a smaller hook, then gently pulling it up a bit so that you can insert the hook. As you’re pushing the hook under the loop, push the loop from the other side with your thumbnail onto the hook.
Or, instead of pushing the tip of the hook under the loop, you can also try to catch the loop with the hook part (pretend the hump loop is a hanger on a coat and you’re hanging the coat on a hook on the wall).
This method creates a dense, thick fabric with the top V chains close to each other.

Hump Stitch in Half Double Crochet:
The hump loop is the one next behind the back loop of the V loops. It does not look like a horizontal bar. It’s the first of two parallel loops going sideways.

Hump Stitch in Double Crochet and Treble:
In double and treble crochet, the hump looks like a horizontal bar, just as in single crochet. This hump is easier to access than the hump in single crochet. Using double or treble crochet will create the V top chains further away from each other.

The space between the top V chains depends on the height of the stitches used; as seen in the photo below:

To crochet a fabric in the style of the chair cover:
Make a template for the shape of the fabric you want to create. Choose your yarns and a hook that fits the yarns. This is a perfect project for leftover yarns!
Start the crochet with a shape or motif for the middle of the scrumble.
Make more rounds into the hump stitch. Use sc, hdc, dc, or tr to shape the center piece into something different, or just go with the original shape. Remember to increase in outward going curves and decrease in inward curves.
Change color for every round if you like.

Make more shapes to attach to the first. I crocheted spirals, using the hump stitches, and placed them around the center scrumble. Notice the color of the spirals meeting up with the same colored “snakes” on the big scrumble (I like to call it the “mother”!).
Click these links to find my patterns for the two color spiral pattern that I used for the cover, the one color spiral would look awesome using the hump stitch, and so do the three or four colored spirals! I have one three colored spiral at the right hand corner of the cover.

Using so many yarns resulted in tons of yarn tails to weave in. Incorporating the smaller shapes also resulted in lots of openings needing to be stitched up. I fastened off the tails as often as I could, but I also used them for closing up the gaps. I recommend leaving the tails in places where you might want to use them for that.
I did the “weaving in” while watching movies with my friend. It’s good to have a distraction like that for that kind of work …

My plan was to completely cover the chair, but there was no time for that. I just got the seat cover done. My friend will later attach it by crisscrossing yarns from edge to edge underneath the chair. Before doing that, she’s going to paint the wooden parts.

Maybe I’ll get to cover up the armrests and the back of the chair next time I go for a visit. Or, maybe she’ll do it herself. I got her hooked on crochet!
~ Marina
P.S.
I’m visiting my daughter in Minnesota. She has a kitty called Snow, who really likes to “help” me out with my yarns! She photobombed my tutorial photos, ran away with the swatch I was working on, as well as being so darn cute I got this tutorial posted three days later than was my intention.

I made the swatch into a new toy for her by knotting together the yarn tails. She loves it. It looks a bit like a shrimp, eh!
Maybe I should add a rattle? I have a previous post about crochet cat toys here …
Related posts:
– Freeform Crochet Basics: The Spiral
– Freeform Crochet Basics: The Two Color Spiral
– Freeform Crochet Basics Part 4
– Freeform Crochet Basics 4b: Bigger Spirals
– Freeform Crochet Basics, Part 5. The Nautilus Shell
– Freeform Crochet Spiral Scrumble
– Freeform Crochet: Single Crochet Spiral
– Freeform Crochet World Let’s meet on Facebook!
More Crochet Patterns:
Leave a Reply to MarinaCancel reply