
I am overwhelmed by the huge response to my humble spiral tutorials! Thank you all from the bottom of my heart!
One request from many of you is to learn how to make the spiral bigger. It’s done the same way as making a normal round shape bigger, by adding one more stitch between the double stitches all around on every level.
It gets a bit more tricky when using several colors though.
Here’s how to do it:
One color spiral
Crochet a spiral according to the tutorial Freeform Crochet Basics: The Spiral. Mark the last stitch you made so you know where the round ends.

Tip: I use the beginning tail as a marker. Just pull it around the stitch with your hook. When you’re done, pull it out at the back to reposition it on the new round. Easy!
When you’re done, you have on your last round one double crochet (DC) between every two DC in the same stitch (2DC cluster).
On the new round you will increase by making two DC between the 2DC clusters.
Learn to recognize the 2DC cluster and know that the new increase always goes into the second DC of the 2DC cluster. As the rounds get bigger and you have more stitches between the 2DC clusters, the job gets easier because you do not need to count the stitches. See the 2DC cluster as a “marker” for the increase!

Also, in case you would lose the real marker, you’ll find your place by knowing that the round ends above the 2DC cluster that’s between the no-added and the added stitches. That is, the DC cluster that has one more stitch to the left than to the right. Look at the picture!

Round 4: *DC in next two stitches, 2DC in next* all around. (48 DC)
Round 5: *DC in next three stitches, 2DC in next* all around. (60)
This pattern increases with 12 stitches on each round. It started with 12 stitches, then 24, 36, 48, 60 and so on.
Continue in this way until you have a piece as big as you want it. You might want to round off the last round to make it an even round shape. There’s instructions for that in Freeform Crochet Basics Part 4.
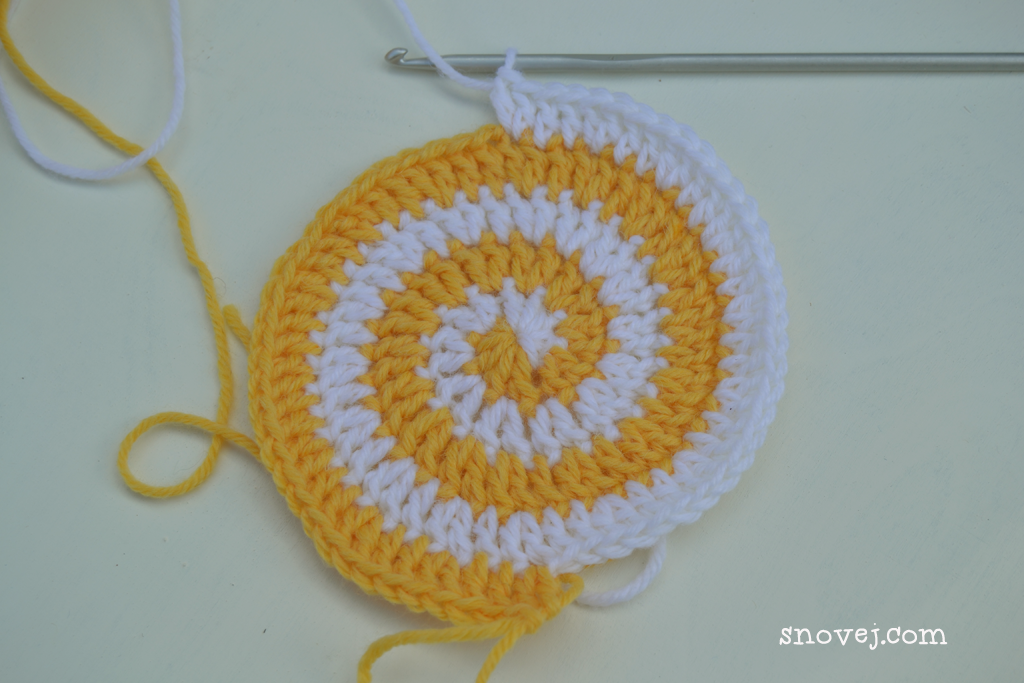
The two color spiral
Start the two color spiral with this tutorial Freeform Crochet Basics The Two Color Spiral. Do not cut the yarns!
Round 4:
First: Continue with color B (white in my spiral). Work *DC into next stitch, 2DC into next* to the end of color A. (24 new stitches)

Look at the place where you started the new stitches. Find the 2DC cluster that has no single DCs to the right, but has one single DC to the left. The new round started with that one single DC.
Also, the round of the first color always ends by making 2DC into the last stitch of the previous round, and this 2DC cluster is your “marker”, having one more stitch to the left than to the right.
Next: Continue with color A (yellow in my new spiral, green in the older tutorial) Work *DC into next stitch, 2DC into next* in the next 16 stitches of color B (white). This is the end of round 4.
The round ended in the middle of the color of the previous round. You know when to end by adding as many stitches as you did with the first color (B).
Therefore you have to keep track of how many stitches you made with the first color at the beginning of the round when you added stitches as far as you could go.

Or, you can learn to find that 2DC cluster that marks the end of a round. In the photo above A marks the first stitch of each color.
Let’s make one more round.
Round 5:
You can continue with either color and crochet to the end of the stitches of the previous round. You also need to increase with one stitch between the 2DC clusters.
Count these stitches, and add the equal amount of stitches with the other color.

In other words: (I continue with yellow): *DC in next two stitches, 2DC in next* to the end. (32 new stitches). Repeat with the other color, not to the end, but until you have created as many new stitches as you did with the first color, in this case 32.
Additional rounds:
Continue in this manner, adding one more stitch between the 2DC clusters on every round, until the spiral is as big as you want it.
Three Color Spiral
Start by following the tutorial Freeform crochet basics Part 4. Scroll down to the Three Color Spiral and make it. Do not cut yarns!
This spiral increases in the same was as the two color spiral, except here you crochet to the end of the first and the second color and stop half way on the third color.
Questions? Do ask me in the comments!
Happy spiraling …
~ Marina
Related posts:
– Freeform Crochet Basics: The Spiral
– Freeform Crochet Basics: The Two Color Spiral
– Freeform Crochet Basics Part 4
– Freeform Crochet Basics, Part 5. The Nautilus Shell
– Freeform Crochet Spiral Scrumble
– Freeform Crochet: Single Crochet Spiral
– Hump Stitch in Freeform Crochet
– Freeform Crochet World Let’s meet on Facebook!
More Crochet Patterns:
Leave a Reply to MarieCancel reply