
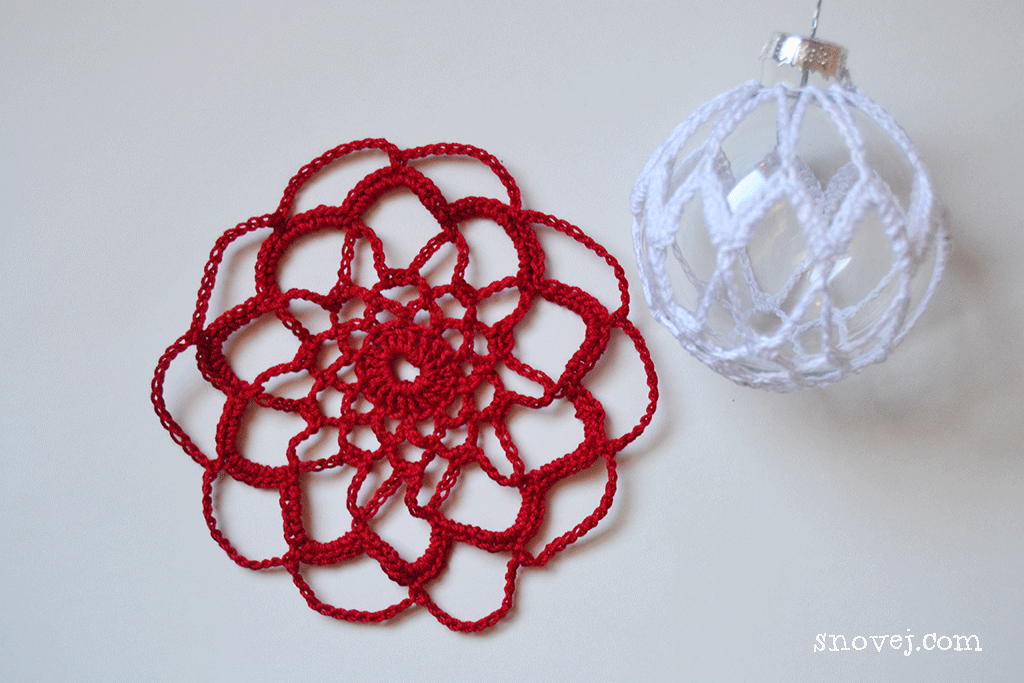
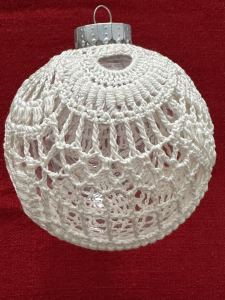
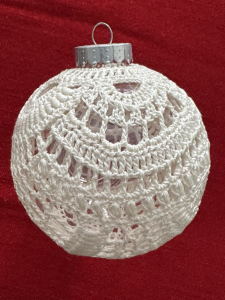
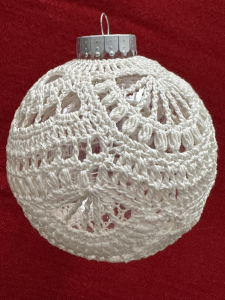
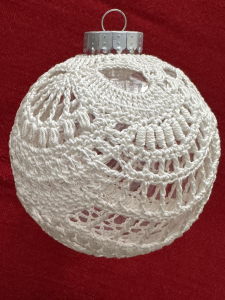
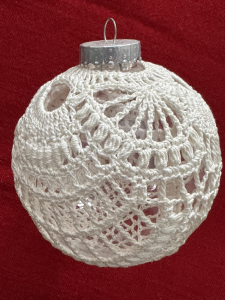
Free the bauble!
After making a dozen of the sweet, traditional, crocheted Christmas balls, my mind refused to follow the patterns. My plan was to create a pattern for a big ball in the traditional style. It just didn’t happen.
I freeformed it instead.
It was pretty cumbersome to both freeform and write down what I did. But I got it done, and you’ll find the pattern below. I do recommend you try your own freeform pattern. Just make it up as you go, maybe using some of my ideas.
I decided to work from the top down. Therefore the first part to be made is a ring that fits around the top. The second part is to crochet a doily like lace cover that slightly curves into a bowl shape. In other words a “faulty” doily that won’t stay flat.
I decided on making overlapping arches. When the cover is big enough to reach the equator of the ball, it’s time to start reducing. Actually you should start reducing a bit before the equator. After that you might want to use stitches that look nice when pulled together, with lots of space in between. I forgot that part and just kept adding . The last part I made with the cover on the ball. It worked fine. Not too tight at all.
Actually, I worked with the idea of yarn bombing. Where you crochet around an item to cover it completely.
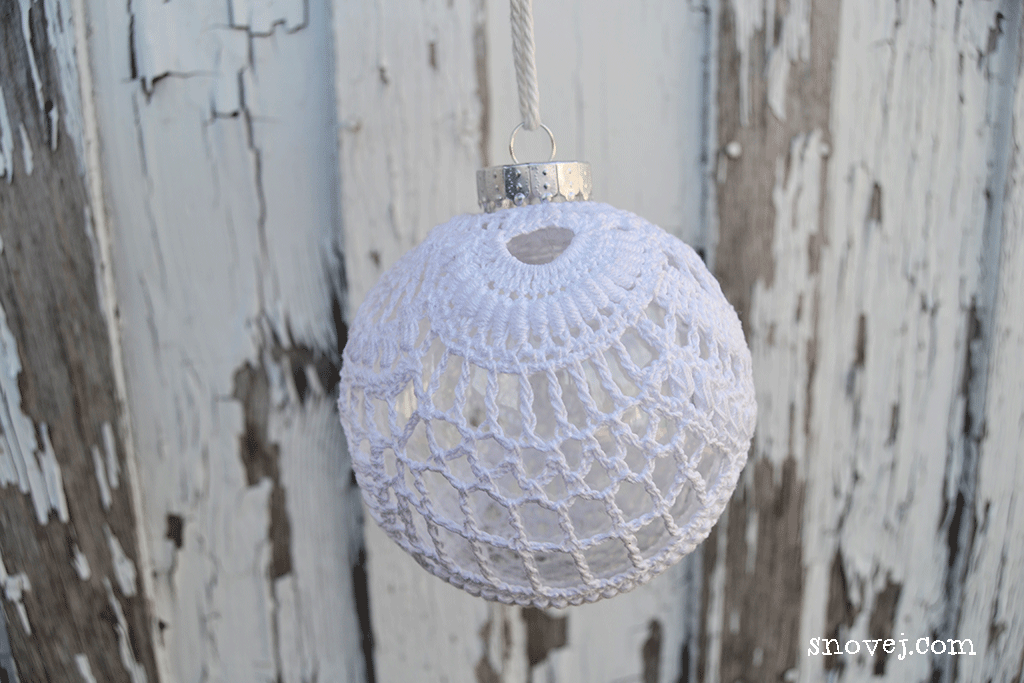
Make sure to frequently try the cover on the ball to make sure the shape is right, and that you insert the ball before the opening gets too small!
I used clear glass baubles, but of course you can use colored ones too. You can also spruce up some old ones!
Add some glitter if you want, by carefully painting (the yarn parts only) with white glue and then sprinkling the glitter on. Let dry, then shake off the unglued glitter.
I started this adventure by making several (yes, a dozen!) traditional ones using free patterns I found online. Here’s my three favorites:
(I made these three ball covers with a hook size US 7 (1.5 mm) and Nr.10 crochet thread.)
This a video pattern. Mikey Sellick shows you how to make a cute and fast cover. At one point he doesn’t slip stitch into the middle of the space. Later he does the same again, this time cutting the yarn to move it into the middle of the chain space. I slip stitched.
I loved making this one. I made six! I did not like tying the knot on top though. It was difficult, even when my daughter tried to help me. The slippery roundness of the ball just didn’t work for me. But I did get them pretty tightly closed up. I’m sure there’s a special kind of a knot to use for this. I just cannot remember it right now.

Another video pattern. Teresa at Crochet Geek makes lovely videos with very clear footage and thorough instructions. I loved how this pattern didn’t require tying a knot. Instead the cover is worked from top to bottom, with a few long loops closing it up.
Crochet Geek has tons of fun crochet patterns on her website and on youtube.com.

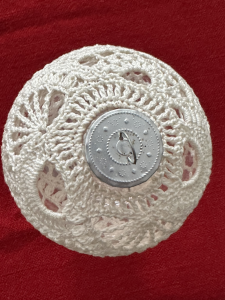
Not until I put the cover on my ball did I realize that the cover was way too big! Then I noticed this pattern is for a slightly bigger ball than my 2 ½” ball. I ripped it up all the way to round 8 and finished it skipping round 9. In other words I made only three rounds with ch4 spaces between the clusters.
Also, on round 2 there’s a mistake. You need to dc2tog, ch2 AND dc2tog into the ch2-space.
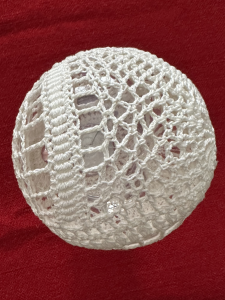
I made the white ball by further changing the pattern. I followed the pattern up to row 7, making only two rounds with ch4-spaces. After that I decreased the same way as the increases. My row 8 has ch3-spaces, row 9 has ch2-spaces, row 10 has ch1-spaces, row 11 has no chain spaces between the double dc clusters. Row 12 has one sc only in the ch2-spaces in the middle of the dc clusters, but that did get a bit too tight. I placed the cover on the ball after row 9.
Freeform Christmas Ornament Pattern
For this ball you need:
a big bauble, 4“ (10 cm) wide
crochet thread Nr.10
steel hook US 7 / 1.5 mm
US Abbreviations:
CH, ch chain
SC, sc single crochet (UK double crochet)
DC, dc double crochet (UK treble)
TR treble (UK double treble)
st, sts stitch, stitches
I like to use capital letters as a command: DC – make a double crochet
and lower case letters for work already done: DC in dc – make a double crochet in double crochet of previous round
Special stitches
Double trebles etc, I just tell you to make a double treble with a certain amount of wraps
Bullion Stitch
Puff Stitch
Feel free (!) to change the stitches into your favorite ones. For example, the bullion and puff stitches can be changed to double crochets.
I divided the instructions into steps. In the beginning they follow the arches, but later they flow into the next arch.
The cover is made in one continuous round, without breaking the thread.
Disclaimer!
This pattern has not been tested. I have given my bauble as a gift and cannot look up any stitches on it. If there’s something you do not understand, just go freeform! Or, you can ask me and I’ll try to explain.
Step 1
CH 30, join into a ring with a slip stitch. 40 SC into ring, join with a slip stitch. CH4, *DC in next stitch, CH 1*, repeat *-* all around. Join with a slip stitch. *SC into ch1-space, CH1*, repeat *-* all around.
Step 2
CH 8, skip 9 stitches, SC, CH 2, skip two sts, slip stitch. Turn. Make 18 DC into ch8-space. Skip two sts, slip stitch, CH2, skip two sts, slip stitch. DC into slip stitch before ch2. Make *bullion stitch with 8 wraps, CH 1* to end of arch. Slip stitch into main ring.
Step 3
Make 5 slip sts back over the bullion sts. Make a *Double TR with 4 wraps into place where the bullion sts row is attached to the main ring, CH 2* six times. Skip six sts on the main ring, slip stitch. Turn and SC 3 into every ch2-space.
CH 2, skip two and slip stitch into bullion sts arch. Turn.
*CH 2, skip one, make a puff stitch with 3 wraps*, repeat *-* to end of row. Skip two on main ring, slip stitch. Turn.
Step 4
CH 2, slip stitch into top of puff st, CH 1, turn. CH 10, skip eight on the main ring, SC, CH 2, skip two, slip stitch. Turn. Make 19 TR into ring, slip stitch into top of puff st, slip stitch into next st. Turn. *SC, CH 1, skip one stitch*, repeat *-* to end of row. Slip stitch into main ring.
Turn. Sc 3 into every ch2-space, skip 6 sts, slip stitch.
Turn. *CH2, skip one st, make a puff stitch with 3 wraps*, repeat *-* to end of row. Skip two sts on main ring, slip stitch in next two sts. Turn. SC 3 into ch2-spaces between puff sts to end of row. Slip stitch in next two stitches on the TR-arch. CH 1.Turn. Going back over the puff st arch, *SC, CH 1, skip one st* to end of row. Slip stitch into main ring.
Step 5
Continue slip stitch into next three sts. CH 8, skip six sts, slip stitch, CH 2, skip two stitches, slip stitch (next to bullion sts arch). 12 DC into ch8-space. Skip two, slip stitch on the main ring. Turn. *2DC, CH 1, into space between double crochets, skip next space* , repeat *-* to end of row. Skip two sts on bullion sts arch, slip stitch in next three sts. CH 3. Turn.
*DC into ch1-space, CH 3*, repeat *-* to end of row. Skip three sts on pupp st arch, slip stitch in next two sts, CH 1. Turn. 4 HDC into every ch3-space, skip two sts on bullion st arch, slip stitch in next two sts.
DC in each stitch to end of row. Skip two sts on puff st arch, slip stitch. Turn.

Going back over DC arch, CH2, DC in next sts to end of row. Skip two sts on bullion sts arch, slip stitch in next two sts. Turn. 3 SC into every ch2-space to end of row. Slip stitch into puff st arch, CH 1, turn, slip stitch into DC arch, CH 1. Turn.
Step 6
*2 DC into ch1-space on puff st arch, CH 1*, repeat *-* to end of row. Skip two sts on TR arch, slip stitch.
CH 2, slip stitch into last DC made, *CH 1, make a bullion sts with 8 wraps in next st on TR arch*, repeat *-* to end of row. Skip two sts on puff st arch, slip stitch in next two sts. Turn. 2 SC in ch1-spaces between bullion sts. Slip stitch into next arch, skip one st, slip stitch, CH 1. Turn. Going back, *DC into next st, CH 1, skip one st*, repeat to end of row. Skip two sts on next arch, slip stitch. 3 SC between puff sts, after last puff st slip stitch into ch2-space.
Step 7
*CH 2, TR into ch1-space above the first bullion sts*, repeat *-* to end of row. Skip three sts on next arch, slip stitch. CH 2. slip stitch into last TR made, CH 2, make a puff st with three wraps in next stitch, *CH 2, skip two sts, make a puff st with three wraps*, repeat *-* until you have 14 puffs, CH 1, 2 DC into st between the two arches. *2 TR into the middle of next 2DC-cluster*, repeat *-* to end of row. Slip stitch into next DC. 2 SC into ch1-spaces between DCs, slip stitch into next arch.
CH 3, skip two sts above the puffs, slip stitch, Ch 3, *TR above DC, CH 2, skip one st*, repeat *-* to end of row, skip two sts on next arch, slip stitch into next two sts, CH 1. Turn. 3 SC into ch2-spaces to end of row. Slip stitch. CH 2, skip two stitches on the SC row you just made, and slip stitch above the TR.
CH 2, TR on top of puff st (between 3SC-clusters) to end of row. CH 2, slip stitch into TR on next arch.
Slip stitch into ch2-space, *CH 5, SC into next ch2-space*, repeat *-* to end of row.
Make 2 SC into ch2-spaces, between the puffs on next arch, to end of row. Slip stitch between the last puff st and 2DC-cluster.
Step 8
CH 6, skip five sts above the puffs, slip stitch. CH 2, DTR w 4 wraps five times. Skip five sts on the DC-arch, slip stitch in next two sts. Turn. 3 SC into ch2-spaces. Slip stitch. CH 2, skip two sts, slip stitch. Turn.
Make *Bullion St with 8 wraps, CH 1*, repeat *-* to end of row. Skip two sts on next arch, slip stitch.
SC to end of row. Skip one st on next arch. Slip stitch. CH 4. Turn. Skip 3 sts of SC row just made. Slip stitch. Turn.
Step 9
CH 3, *DTR (3 wraps), skip two sts, CH 3*, repeat *-* to end of row. Skip three sts on next arch, slip stitch (above DC), slip stitch in next. Turn. 4 SC in ch3-spaces just made.. Slip stitch in next arch. CH 3, skip two sts, slip stitch. CH 1. Turn. Make *Puff St with three wraps in next st, CH 1, skip one st*, repeat *-* to end of row. Slip stitch above DC on next arch, slip stitch in next.
Turn. 2 SC in each ch1-space between puffs. Slip stitch in next arch. SC in next, skip one stitch.
2 SC into space between arch and bullion st. Continue with 2 SC between bullion sts to end of row. Slip stitch into next arch. Slip stitch into next two sts. CH 1. Turn. *DC into next st, CH 2, skip one st*, repeat *-* until you have 13 DCs. Skip one st and DC one more time. Slip stitch into next arch above puff st. This pulls the two arches closer together, leaving a small hole between them.
Step 10
CH 6. Turn. SC into third DC. DTR with 4 wraps into same st as slip stitch, CH1, four times. Skip five sts on next arch, slip stitch. Slip stitch in next two sts. CH 1. Turn. 2DC in ch1-spaces. Slip stitch into Dc on next arch. Slip stitch to next DC. Turn.
DC, CH 1, DC into middle on 2DC-clusters to end of row. Skip two sts on next arch, slip stitch above puff st. Slip stitch in next two sts. CH 1. Turn.
DC, CH 1, DC into ch1-spaces. CH 1. Slip stitch into DC on next arch. Turn.
CH 3, SC into all ch1-spaces. DC into next st on next arch, CH 1, skip one stitch, *DC, CH 1, skip one st*, repeat *-* until two sts remain. Slip stitch into DC of next row.
CH 3, SC into ch5-space (on next arch) to end of row. Skip two sts on next arch. Slip stitch. Slip stitch in next three sts. CH 1. Turn.
*TR into ch3-space, CH 2*, repeat to end of row. Slip stitch into DC of next row.
Slip stitch in next four sts.
CH 1, *DTR (three wraps) into TR, CH 2*, repeat to end of row. Slip stitch into third st on next arch. Slip stitch into next. CH 1. Turn. 3 SC into ch2-spaces to end of row. Slip stitch into next arch. Slip stitch in next three sts. Turn.
Bullion st ( with ten wraps) in each st to end of row. Slip stitch into next arch. Slip stitch in next st, CH 1. Turn.
SC between bullion sts to end of row. Slip stitch.
Step 11
Ch 3. Slip stitch into DC. *CH 1, skip one st, DC in next*, repeat *-* three times. *CH 1, skip one st, TR in next*, repeat *-* four times. *CH 1, skip one st, DC in next*, repeat *-* three times. DC between puff sts on next arch.
DC into DC on next arch. CH 1.
By now there’s no “arches”, just one round of stitches.
Now is the time to put the cover on the ball for the last time. The opening is getting smaller by the stitch.

Step 12
DC, CH 1 into next six DCs. SC into ch3-space. Ch 3, SC into next four spaces.
Ch 1, Dc in next DC, DC in next DC, CH1, DC in next DC, skip the corner and DC in next DC above the bullion sts. *CH 3, SC in next ch1-space*, repeat *-* 5 times more (6 ch3 spaces).
CH 1, skip on DC, TR in next DC. CH 1. Skip one ch1-space, SC in next space.
*CH 1, DC in next dc*, repeat *-* three times more. CH 1, SC into ch3-space.
CH 2, SC in next space, CH 2, SC in next space, CH 2, SC in next space.
DC in next three dcs. SC into next ch3-space.
LAST ROW closing the gap.
CH 2, slip stitch into ch3-space above the gap (before the three dcs just made)
CH 2, slip stitch into ch3-space below the gap. Continue in this manner until you reach the dcs above the gap. Continue in same manner, but slip stitch in every other space between the dsc.
Slip stitch into the last ch3-space below the, now closed up, gap.
Cut yarn and weave in the end. Attach a hanger of choice to the top and enjoy. If you finished these instructions, you deserve a big pat on you back! Hip hip hurray!

Did you make handmade ornaments this year?
~ Marina
Edit!
Apparently there’s a problem somewhere in the pattern. If you do attempt to follow it, I encourage you to do your own thing by making new stitches where ever you feel is right. It’ll beatiful too!
Here’s more photos to help you out!
Leave a Reply to ElaineCancel reply